So first we built a box.
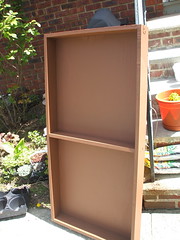 The box has a back of 2' x 4' exterior grade plywood and the sides and center piece are 1" x 4". We added the center piece for strength and stability, and to act as a brake so the potting soil wouldn't all sag down to the bottom. We then painted it with solid stained wood protector and waterproofer. After that dried we used 2 layers of 4 mil plastic stapled into the inside of the box - including through the drainage holes and the watering holes up top,
We then filled it with moisture control potting soil mixed with perlite.
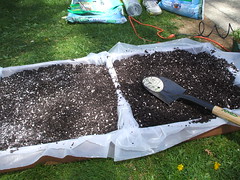 We added more potting soil than the photo shows to "overstuff" the wall. After the soil we covered the box in sheets of sphagnum moss.
Then we set the plants on top to try to arrange them.
 We decided that we needed more plants as well as another package of moss to cover the bare spot you can see there. So we went down to a different nursery than we b0ought the other plants from last week, and found some different kinds of plants ( the 2 yellow flowers - Erysimum were from Home Depot ) And we ended up with this.
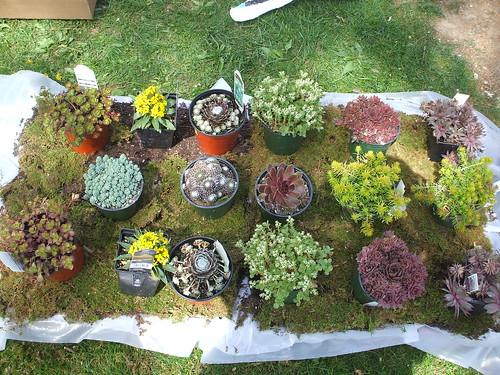
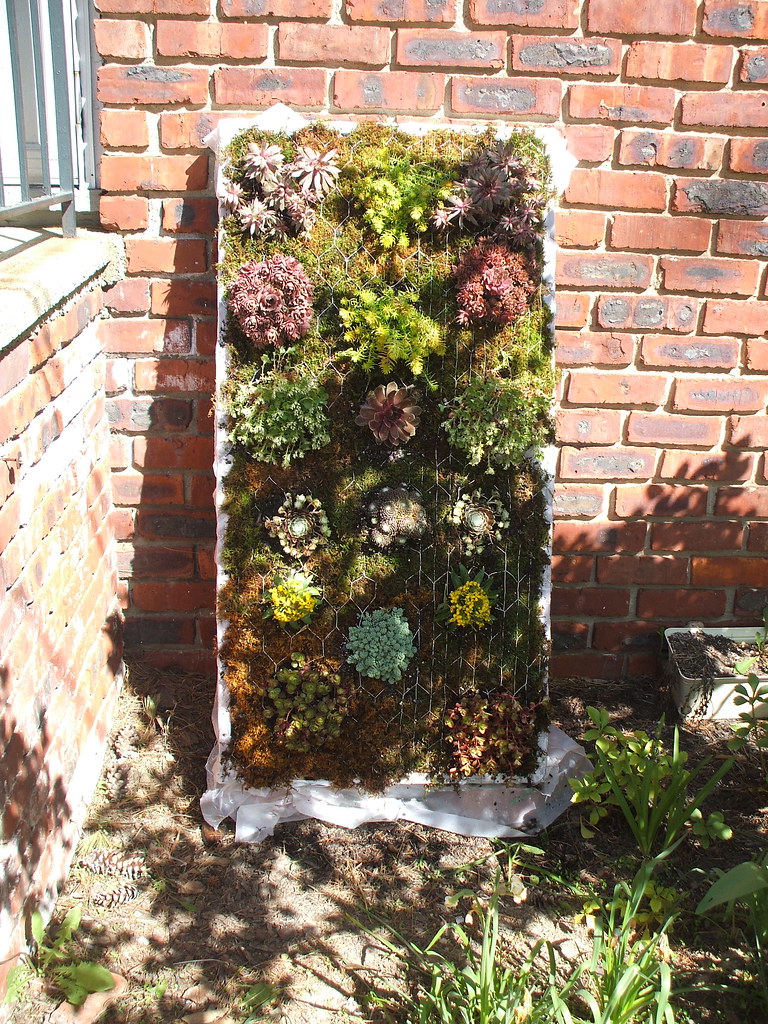
Then once we covered the soil with the moss we stretched some large opening chicken wire fencing over top and stapled that on ( the plan is the moss and the plants will eventually cover the wire) Then came the time consuming task of cutting pieces of wire so we could plant the plants in the box. We then partially watered it, so it would hopefully remain stable while we moved it into place. We had gotten 2 10"windsor wall stones that have a little lip which normally would point down to lock a wall together. We put it up so that it acted like a lip for the box to rest on so it wouldn't slide. The box is not perfectly vertical but leans on a slight angle. It rests on the stones so it is not sitting in the dirt. It is on the left side of the garden wall for 2 reasons. 1) it will get more sun there ( all the plants are only partial sun and the ones on the bottom prefer shade) 2) It would have been really really hard to get the box to the other side!
So here is the finished box:
You Are Extremely Bold |
 When you want something in life, you'll just go for it. You're never afraid of taking the plunge, even if there's risk involved. You don't shy away from speaking up or speaking your mind. You live life as it should be lived: with total enthusiasm and no fear. |
So this is what you were talking about last week. It's a piece of work I tell you and I mean that in the most positive way. I mean I've never seen one and I love it. How cool. I can't wait to see this when it's totally grown and the wire isn't showing. How clever this is. It's totally wonderful. You and Curt did an excellent job :)
ReplyDeleteYour living wall is wonderful! It looks like a painting.
ReplyDeleteWow this is amazing! I am sitting here with my mouth wide open ~ stare at that living piece of art. Please post update pictures over the the spring and summer. You and Curt did a great job!
ReplyDelete